Architectural modeling with softbodies
Introduction
For this tutorial you need to know the basics of Blender, but no background knowledge about softbody is needed. This tutorial doesn't aim to explain everything about softbodies in Blender. It just shows the basics of it in a different way and in a very bad english.
In this tutorial, we'll talk about using Blender's Softbodies to model coupolas, archs and much more. Yes indeed it is something more about fun and experiment than efficiency, but this technique has already been used long time ago (and without Blender !).
The main idea is to adapt the method used by Antoni Gaudi to design the archs and coupolas of the Sagrada Familia in Barcelona.


He built a funicular model of the building. To make it simple, lets say he suspended some ropes which he loaded at some points with small bags full of sand. Those bags simulate the loads applied to the structure. If you look the rope upside down, it has the shape of the coupolas which will resist the best to the load. You can make it simpler just with a piece of rope which take under its own weight the shape of a catenary. This shape is the ideal arch in a structural point of view. You find it in many building cultures (in Iran in the next picture), though it is often known as "nubian vault" since the works of Hassan Fathy.


Hum, lets go back to Blender. It wil help us to simulate those pieces of rope...
First step : A grid and a
vertex group
Let imagine now that our grid is a piece of elastic material. We must now say to Blender which part of the grid will be fix and which will be able to deform. We are going to fix two sides and let the grid hanging down and see what happens.
For that, we go to Editing pannel (F9) and on the left side, we have the Vertex Groups Pannel. A vertex group allow to assign a weight between 0 and 1 to every mesh's point. It allows to keep a memory of vertex selections too. We can have as many Vertex Groups as we want, but in our case we will just need one. The points with a weight set to 0 will be free, the ones with a weight of 1 will be fix.
Let's create a Vertex Group clicking on New:

We have several options (we will not use all of them here):
- Changing the group's name (by default Group)
- Select another group (if we have more than one) with the double arrow on the left of the name.
- Delete the group.
- Assign a weight to the selected vertices and in the same time if not done yet, assign the selected verices to the Vertex Group. We first change the weight value then click on assign. We see here one tricky point: the button Assign has two functions, it assigns the selected vertices to the vertex group and it assigns a weight value to the selected vertices.
- Remove the selected vertices from the Vertex Group.
- Select the vertices of the
Vertex Group or deselect it with
desel.
In our example, we want that all the vertices are used in the softbodies simulation. So we select all the vertices, then click on Assign. If you didn't touch anything, Weight should be set to 1, meaning we assigned at the same time a weight of 1 to all the vertices. If Weight was not set to 1, you should set it to 1, and with all the vertices still selected click again on Assign.

Now we select all the vertices exept two sides like on the picture above, we set weight to 0 and click on Assign.
To check that everything went right, in a 3D view, we choose Weight Paint mode. This mode shows the weight value for the vertices (Red means 1 and blue means 0). You should see that:

Step 2:
Change the Grid to a Softbody

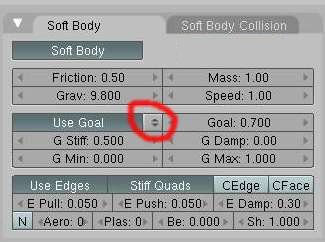
We then have a lot of strange buttons with many values. Don't Panic ! It's easy to have something happening (but much more difficult to get what you want). The most important is to say to Blender to use the Vertex Group we created just before. For that click on the double arrow just at the right of Use Goal and choose the group you want (in our example, their should be only one group named Group) :
Step 3 : Et voilà
It's very easy: just put the cursor in a 3D view and hit Alt+A. You can stop the animation by hiting Space or cancel it with Escape. And you should obtain something like a inversed vault:

To see the animation in all the 3D views, hit Shift+Alt+A . You can see frame by frame with the right and left arrow. (this one has improved a lot since 2.46 ). If your animation freezes after 250 frames, don't worry, we'll see later how to change that.
Step 4 : Some settings and improvements
It's not yet very impressive but we'll try to improve it. For that we will make a coupola. We can move the vault to another layer. And we start again all the previous steps, fixing the four corners of the grid and letting everything else hanging down:
We add another 20x20 grid (Space/Add/Mesh/Grid). We select all the vertices, we create a new Vertex Group, we set the weight to 0 and we click on Assign. Then we deselect all, select the four corner vertices only, set the weight to 1 and click on Assign. We click on Set Smooth in Object Mode to make it look better, then we go back to the Object Buttons Window (F7) and in the Physics pannel we click on Soft Body. We don't forget to choose the Vertex Group we created (named by default Group) near the Use Goal button, and we hit Alt+A to see the result.
If we want to have the cuppola pointing to the top, we can set a negative value to Grav (for gravity, it's value on Earth is 9.8, so we'll stick to -9.8).

We can now try other values for E Pull and E Push which set the elasticity of the material when it's extended and compressed. We see here under the same grid with different values of E Push and E Pull at the frame 34:

If you activate Stiff Quads, the quads (faces with 4 edges) will be calculated as if they have springs in their diagonals. Generaly, it gives more realistic results, more "cloth" than "chewing-gum", and sometime less funny. In the next 2 screenshots, we can see the same grid with E Pull/Push set to 0.2 and for the blue one Stiff Quads activated, at two different frames:


Step 5 : Clear the cache and/or apply
The calculation is automaticaly cached in memory without you doing anything. You will just notice that the first time you play the animation with Alt+A it's much slower than the next ones. Anytime you change a setting in the SoftBody panel, all the cache will be emptied (which means that your softbody will just turn back to flat). To see the effects you have to come back to frame 1 and start again.
To control the cache and save your animation (we call that Bake) you must open the Collision pannel that I put aside in the next image (why the collision pannel ? ask Big Buck Bunny, he may know). In that pannel you can set the first and last frame of the softbody calculation, which can be different from the ones set in the render pannel. You see here what is shown before you play any frame, "No simulation in disk cache":

Once you moved to another frame with arrow key or with Alt+A, you will see that there are now Simulation frames in disk cache, and you can free it withe the Free Cache button:

Once you are happy with
your animation, you can bake it with the Bake
button, it will calculate again everything. Now, you can't change the
settings anymore until you hit the Free Bake
button.

Note: The cached and baked files are saved in a file named "blendcache_yourfile" in the same file as the yourfile.blend. It is not included anymore in your file, even if the file is packed (the ones who use 10 autosave files like me know that it is not a bad idea). A 2 cents question now: where are the cache files before the first time you save your .blend ?
And finaly, if you like your softbody at a frame and you are not interested anymore in the animation, you can fix the shape to make it a standard mesh again that you can edit in the usual way.
For that, go to the Editing pannel, and in the Modifier pannel you will notice that the softbody is a modifier. Just click on Apply (even if you didn't bake before), and the material will freeze forever, almost.

"Almost", because you can set it again as a softbody with different settings. For example, I freezed my vault, then set some parts free as you can see on the left one in weight paint mode (blue parts are elastic in case you forgot) to get the one on the right.:

Step 6 : Let's have more fun

At the top, the Weight slider sets the weight value we want to paint. Under we can set directly this value with 1/4 steps.
The Opacity slider sets the opacity of the brush (from 0 to 1), with the same type of presets under.
And the Size slider sets thes size of the brush. This size is set respectively to the 3D view, which means that if you zoom in, you will paint smaller drawings on your mesh.
On the right part, you find the mixing modes you are used to if you know painting softwares. We will keep Mix here. With Spray, the longer we stay on the same place, the more it will be painted. Soft makes the brush paint with soft borders. X-Mirror makes all the painting symmetrical. We will not see here the other settings.
The best is to practice, so try in the 3D view to get something like this with your grid in Weight Paint Mode. If you start with a new grid, I advise you to first select all the vertices in Edit Mode and assign a weight of 0 to them:


To give you an example of the use of this, I made this image long time ago, it's a building in Bam, Iran, that has been destroyed by an earthquake. I modelled all the vaults and cuppolas using the traditional drawing methods used by the iranian builders. For the roof, I just used proportional editing on a subdivised mesh (you can click on the image to see a bigger one, or go to my gallery to see other ones) :


I tried to model the roof roughly with softbodies, it took less than 20 minutes with some tweaking to get this result (you see the weight painting too):


Conclusion
That's all folks. If
you want results that should be more or less stable or realistic (like
Gaudi's
method), you must take the shape once stabilized. This needs sometimes
to lengthen the animation time, or increase the Speed value of the
Soft Body pannel, or increasing the E
Damp
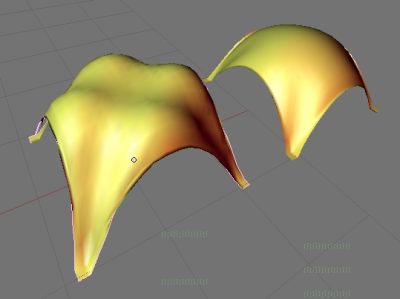
(but not too much). For example, you see in the next image the same
softbody at two different frames. The left one, though you may find it
nice (or not), is not a stable form, it has been frozen while the
softbody was
moving a lot. The right one is stabilized and therefore much more
realistic as a stable form.
The possibilities are as always with Blender endless. Just try tweaking. I used it too to see how a building whould deform if it was elastic.

To go further, you can search tutorials about how to use collisions and force fields.
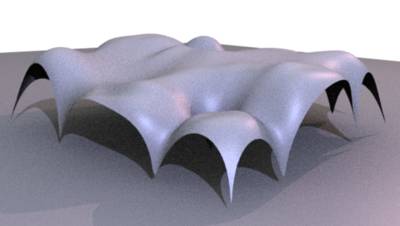
And here under are some examples of what you can easily do (I know, this looks like old 60's architectural experiments ...)And you can see
animations here.


Creative Commons SA , Viralata (Matthieu Dupont), june 2008